Introduction
The Secure Messaging Inbox is your central hub for managing incoming clinical communications in MediRecords. From this inbox, you can receive patient results, exchange secure messages with other providers, and view scanned documents that have been assigned to you. Once messages are reviewed, they are safely stored in the patient’s clinical record for future reference.
This guide explains how to make the most of the Secure Messaging Inbox, including how to view, filter, and search messages, as well as how to link results to requests, open or create patient records, and manage message flags such as Patient Notified or Confidential. You’ll also learn how to take quick actions directly from the inbox - like creating tasks or clinical actions, booking appointments, or sending SMS messages.
By the end, you’ll know how to efficiently manage secure correspondence and ensure all patient information is correctly recorded in MediRecords.
- READ permission is required for Inbox for viewing
- UPDATE permission is required for making any changes in the Inbox
Contents:
What is the Secure Messaging Inbox?
This inbox is used to receive results for patients, correspondence from other providers, and to view scanned documents assigned to you via the Bulk Scan Upload.
*NOTE: Inbox is part of the Clinical module and is only visible when you have either a Clinical or an Integrated subscription in MediRecords.
Viewing the Secure Messaging Inbox
-
To open the Inbox, click the Mailbox Icon, which is the sixth tab on the MediRecords Application Ribbon.
The Inbox can also be opened directly from the Home Tab. Click View underneath the Lab Results Counter.
Users with a Practice Manager subscription will not be able to see the Inbox. If you are a user with a Practice Manager subscription, please click here to proceed to our article on the Holding Bay.
If you have an Integrated subscription, you will need to click the Inbox button to switch to your Inbox.
If you have a Clinical subscription, you don't need to worry about this step, as you will only have access to the Inbox.
The Inbox stores all secure messages that have been linked to a patient and allocated to you. Messages will stay in the Inbox until reviewed and then formally closed.
Once a message has been checked, it will be stored in the Correspondence In section in patient file.
Once a result is checked it will be stored under Investigations (Results) in the patient file.
Filtering the Inbox
The Filters in the Inbox give you the ease to filter out messages based on:
Type
- Letters - all inbound correspondence that get saved in Correspondence IN in patient files once checked.
- Pathology Result - Results from Pathology labs that get saved in Investigation (Results) in patient files once checked.
- Radiology Result - Results from Radiology labs that get saved in Investigation (Results) in patient files once checked.
-
e-Letters - all inbound correspondence from Dynamic Letter that get saved in Correspondence IN in patient files once checked.
Status
- Checked - Messages that have been checked; checked messages get closed automatically and the status cannot be edited.
- Unchecked - Messages that are unchecked. They are open and the status can still be edited.
- Open - These are unchecked messages.
-
Closed - Messages that are checked get closed automatically.
Provider, Patient, & Date
-
Provider
This field allows you to search and select particular providers or ALL providers -
Patient
This field allows you to search and select particular patients or ALL Patients -
When
This field allows you to select a date range from the given options (Today/ Last week/ Last month/ Last 6 months).
Searching the Inbox
You can search the Inbox using a Keyword from the Subject / Request name/ Patient Name/ Provider name, To or From fields in the search bar.
Just type the word into the search-box and the system will populate a list of the closest matches with all statuses.
Reassigning a Message to a Different Patient
If a message was assigned to a patient in error and you need to re-assign it to the correct patient, follow the below steps:
1. Click on the envelope icon to open Secure Messaging.
2. Select Inbox
3. Select the message that needs to be re-assigned
4. Click on the Patient name highlighted in Blue - this is a search and select field.
5. Now enter the correct patient's name.
The message will now get assigned to the patient that was last typed in.
Linking a Result to a Request & Updating the Status
To link a result message to an existing request in the patient's clinical record, follow the below steps:
1. Click on the envelope icon to open Secure Messaging.
2. Select Inbox
3. Select the result that needs to be linked to the request
4. Click Link to Request. The message will expand to display a list of all outstanding requests for the patient.
Click the Tick-box next to the name of the open request and click Partially Received or Fully Received.
You will receive a pop up notification that the result has been successfully linked.
Opening a Patient Record from the Inbox
To open a patient record from the Inbox, follow the below steps:
1. Click on the envelope icon to open Secure Messaging.
2. Select Inbox
3. Search and Select a patient's result or message
4. Click More to reveal a drop-down list, and click Open Patient.
You will now be re-directed to the patient record.
Creating a New Patient from the Inbox
To create a new patient from the message, follow the steps below:
1. Click on the envelope icon to open Secure Messaging.
2. Select Inbox
3. Search and select a patient's result or message
4. Click More to reveal a drop-down list, and select Create New Patient.
This will now open a new patient form.
Setting the Patient Notified Flag
To flag a message as patient notified, follow the steps below:
1. Click on the envelope icon to open Secure Messaging.
2. Select Inbox
3. Search and Select a patient's result or message
4. Click More to reveal a drop-down list, and select Patient Notified.
Note: This selection does not actually notify the patient but is for record purposes only, that the patient has already been notified.
Setting the Confidential Flag
To flag a message as Confidential, follow the steps below:
1. Click on the envelope icon to open Secure Messaging.
2. Select Inbox
3. Search and Select a patient's result or message
4. Click More to reveal a drop-down list, and select Flag as Confidential.
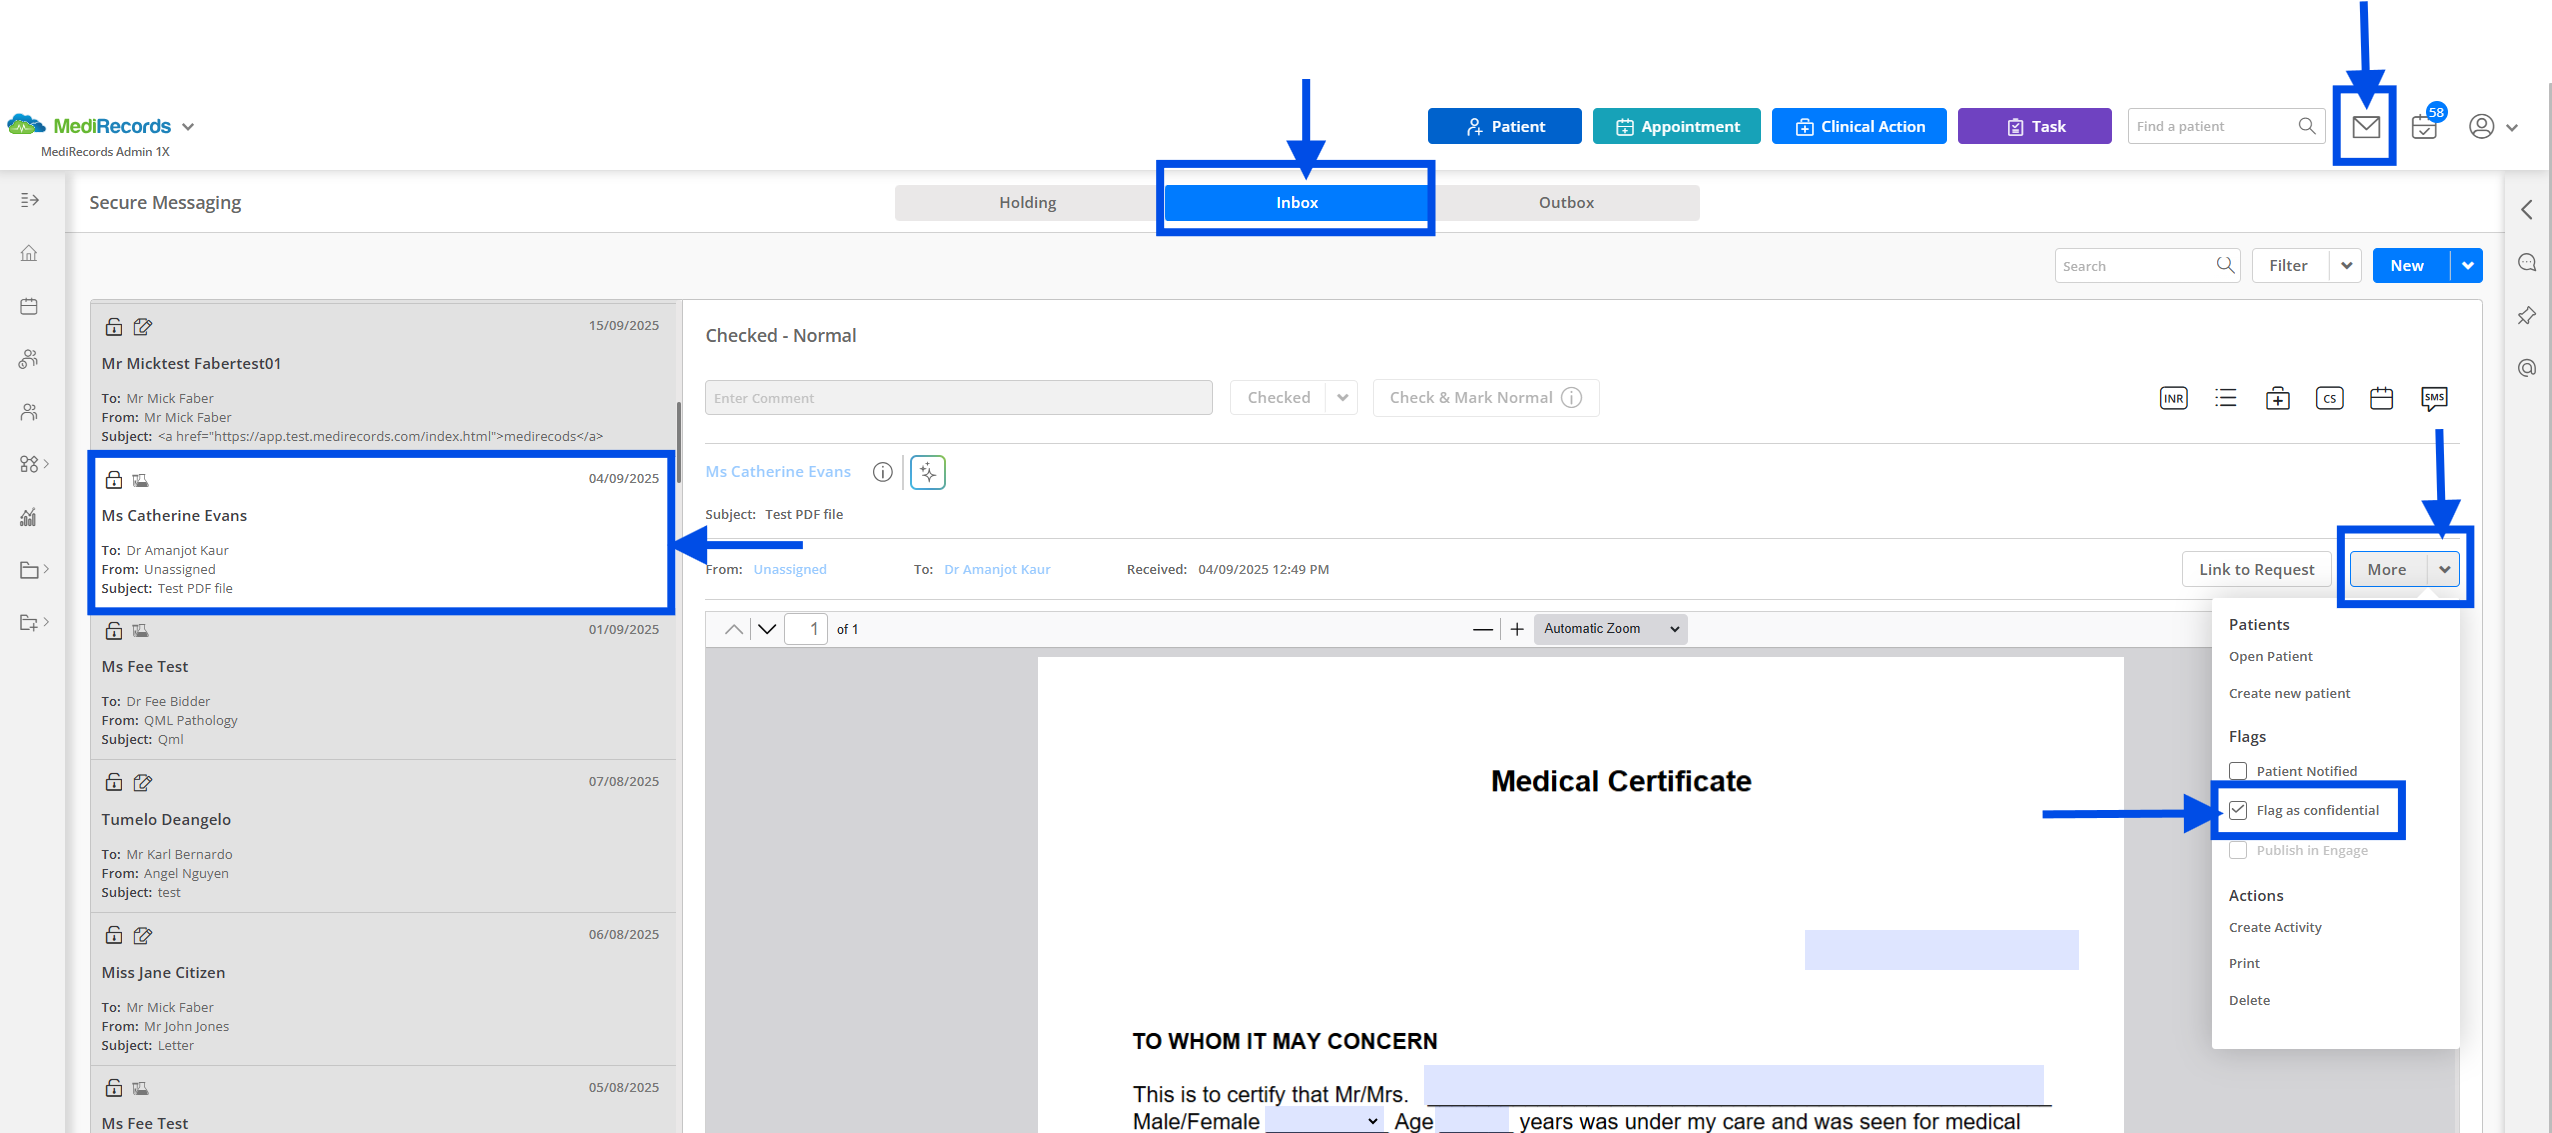
Once this is done, you will notice that the lock symbol above the patient's name will appear locked.
Printing a Message
To print a message, follow the steps below:
1. Click on the envelope icon to open Secure Messaging.
2. Select Inbox
3. Search and select a patient's result or message
4. Click More to reveal a drop-down list, and select Print to open a print preview.
This would now bring up the preview window to print
Deleting a Message
To delete the message, follow the steps below:
1. Click on the envelope icon to open Secure Messaging.
2. Select Inbox
3. Search and select a patient's result or message
4. Click More to reveal a drop-down list, and select Yes to acknowledge the message will be deleted.
Adding an INR Result
To add details of the patient's INR, follow the steps below:
1. Click on the envelope icon to open Secure Messaging.
2. Select Inbox
3. Search and select a patient's result or message
4. Click INR to open the INR form.
This will now open up the INR form to be filled as below
Note: Reason for Anticoagulation and Next INR Due are mandatory fields. You can also add this to Consult Notes.
Adding a Cervical Screening Result
To record a Cervical Screening Result, follow the steps below:
1. Click on the envelope icon to open Secure Messaging.
2. Select Inbox
3. Search and select a patient's result or message
4. Click CS to open the cervical screening form. The patient's gender must be saved as female in MediRecords for this option to appear.
This will now open the Cervical Screening report form as below.
You can add in all the necessary details and select Save.
This information will now be available in the Patient's Record > Clinical tab > Cervical Screening section.
Note: Result is a mandatory field
You can mark this result as confidential as well as add it to Consult Notes
Creating a Task
To create a Task regarding a patient, follow the steps below:
1. Click on the envelope icon to open Secure Messaging.
2. Select Inbox
3. Search and select a patient's result or message
4. Click the Task Icon to open the task form.
The task form will be opened as below. Click Save when details have been filled.
"
This information will now be saved as a new Task for the Assignee.
Once the task has been saved, the task icon will appear in a light blue to indicate that there is a task created for this result/ message.
Creating a Clinical Action
To create a Clinical Action regarding the patient (e.g. Recall), click the Clinical Action Icon to open the form. .
This will open a New Clinical Action Form. Enter all required fields and click Save.
Booking an Appointment
To book a new appointment for the patient, click the Calendar icon to open an appointment form.
Fill in all the required details and click Save.
Sending an SMS
To send an SMS to the patient, click the SMS icon to open the SMS On Demand form.
Fill in all the required details and click Save.
Still need help?
If this article did not fully answer your question, our Support team is here to help. We can assist with troubleshooting, guidance, or clarifying how MediRecords works.
Contact MediRecords Support
Phone: 1300 103 903
Email:
support@medirecords.com
Live chat: Available directly within the MediRecords app or via
the Knowledge Base
Want to build confidence using MediRecords?
We offer tailored software training for individuals and teams, whether you need help with specific workflows or a broader overview of the platform.
To enquire about training, contact your Customer Success Manager or email success@medirecords.com.
Comments
0 comments